Give Dust Agents Access to Your Internal Systems with Custom MCP Servers


The Model Context Protocol (MCP) is revolutionizing how AI agents interact with external systems, and Dust is at the forefront of making this technology accessible to everyone.
In our last Dust session for builders, we demonstrated how MCP transforms the way you can create and deploy AI agents that take real actions in your business workflows. In this post, we'll cover the key learnings and share a hands on guide on how to create custom MCP servers.
Watch the replay
What is MCP? The "USB for LLMs"

Think of MCP as a universal translator between AI models and the tools they need to use.
Before MCP, every connection between an AI and an external service required custom integration work. Now, MCP provides a standardized interface that allows any AI agent to communicate with any compatible service.
The Two Sides of MCP
MCP operates on a simple client-server model:
- MCP Servers provide tools and can list available tools and their parameters and execute tools when requested by clients
- MCP Clients consume tools and can request lists of available tools and call specific tools with appropriate parameters
This standardization means that once you build an MCP server for your custom backend, any MCP-compatible AI platform can use it immediately.
How Dust Leverages MCP
Dust operates as both an MCP client and server, giving you maximum flexibility:
Dust as an MCP Client
Your Dust agents can connect to external MCP servers to:
- Take actions in third-party systems
- Retrieve real-time data
- Execute complex workflows across multiple platforms
Dust as an MCP Server
Other AI tools (like Claude Desktop, Cursor, or VS Code) can connect to Dust to:
- Access your company's knowledge base
- Leverage your existing data connections (Notion, Google Drive, Slack, etc.)
- Use your configured AI agents as tools
Real-World Example: Building a customer support agent that interacts with an internal database
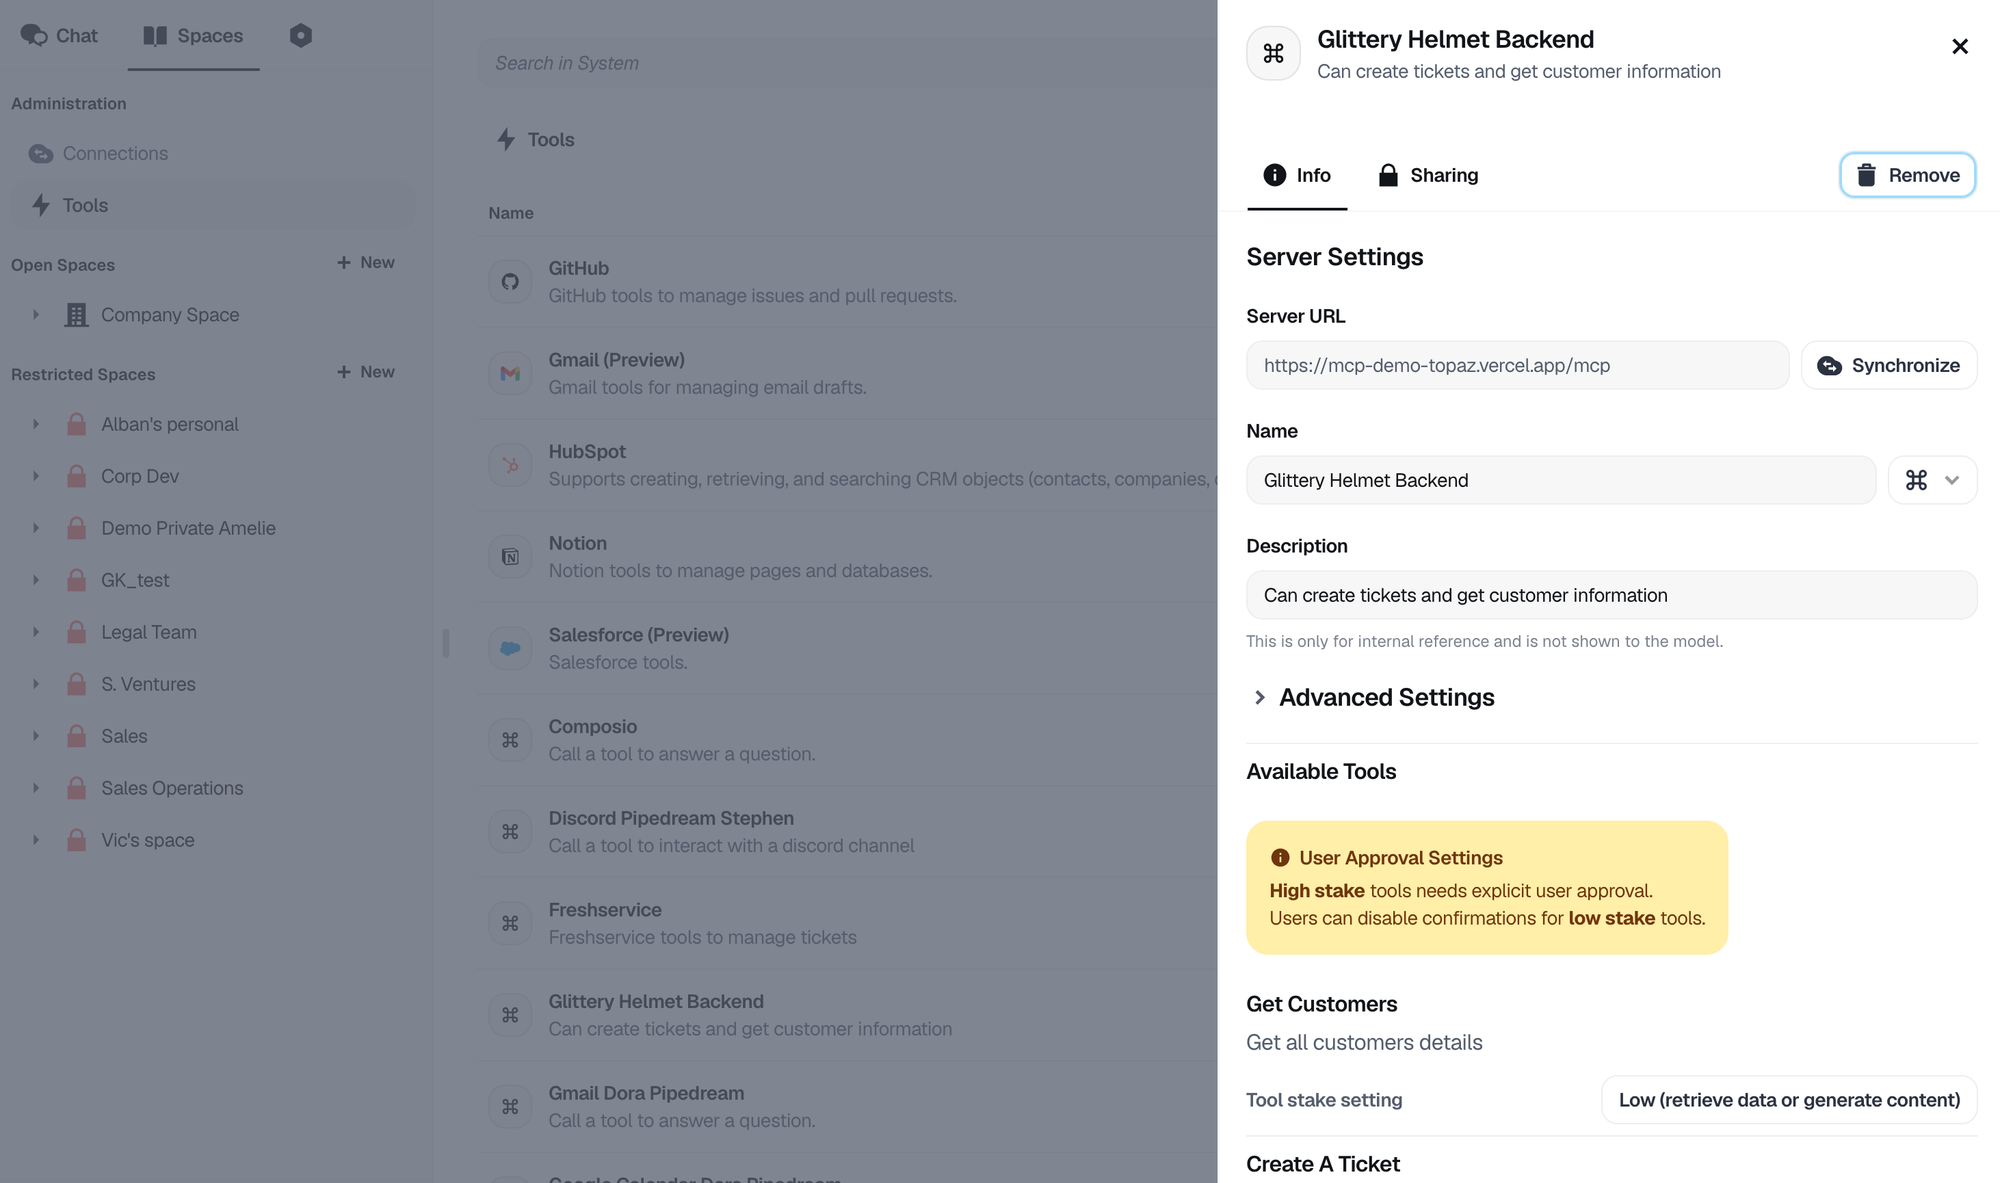
In our demo, we built a customer support agent for "Glittery Helmet," a fictional security company that is connected to our own backend, can get information and take actions.
The Setup
We created a custom MCP server with two simple tools:
- get_customers - Retrieves customer details from our backend
- create_ticket - Creates new support tickets with proper formatting
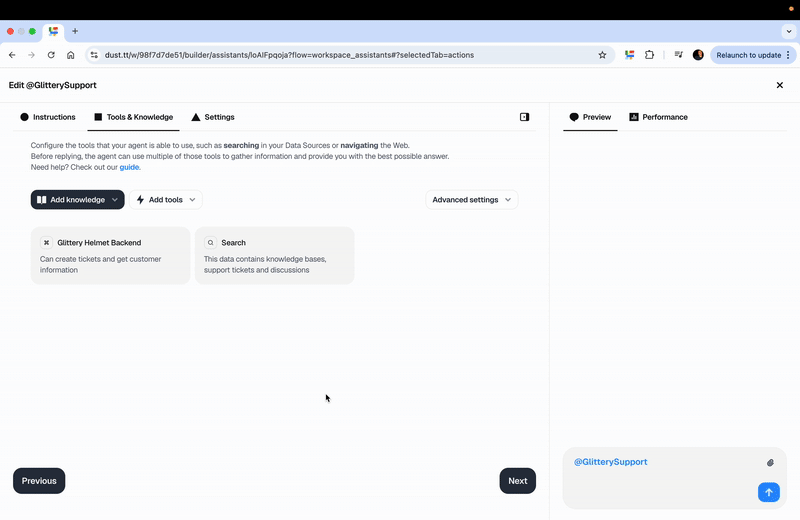
We then create a "@GlitterySupport" agent with access to this new MCP server, alongside another “search” tool.
The Magic in Action
When a user reported: "Customer has issues with user activity reports - looks like it's missing some data when they're generated," our agent:

- Automatically retrieved customer details (on our own database) using the MCP server
- Searched existing knowledge for similar issues using Dust's semantic search
- Created a comprehensive ticket with:
- Customer context and plan details
- Related historical issues
- Technical impact assessment
- Recommended next steps
All of this happened without any custom coding for the AI agent itself - just by connecting it to our MCP server.
Here is the ticket the agent created in our system:

How to Build Your First MCP Server
1. Choose Your Deployment Platform
We used Vercel for simplicity since they provide a MCP template, but you can deploy MCP servers anywhere: (i) Vercel, Netlify, or Fly.io for serverless (ii) Cloud Run, AWS Lambda, or Azure Functions (iii) Your own infrastructure.
2. Define Your Tools
Using the Anthropic MCP SDK, defining a tool is straightforward:
3. Test with MCP Inspector
Anthropic provides an MCP Inspector tool that lets you test your server before connecting it to Dust:
- Verify your tools are listed correctly
- Test tool execution with sample parameters
- Debug authentication issues
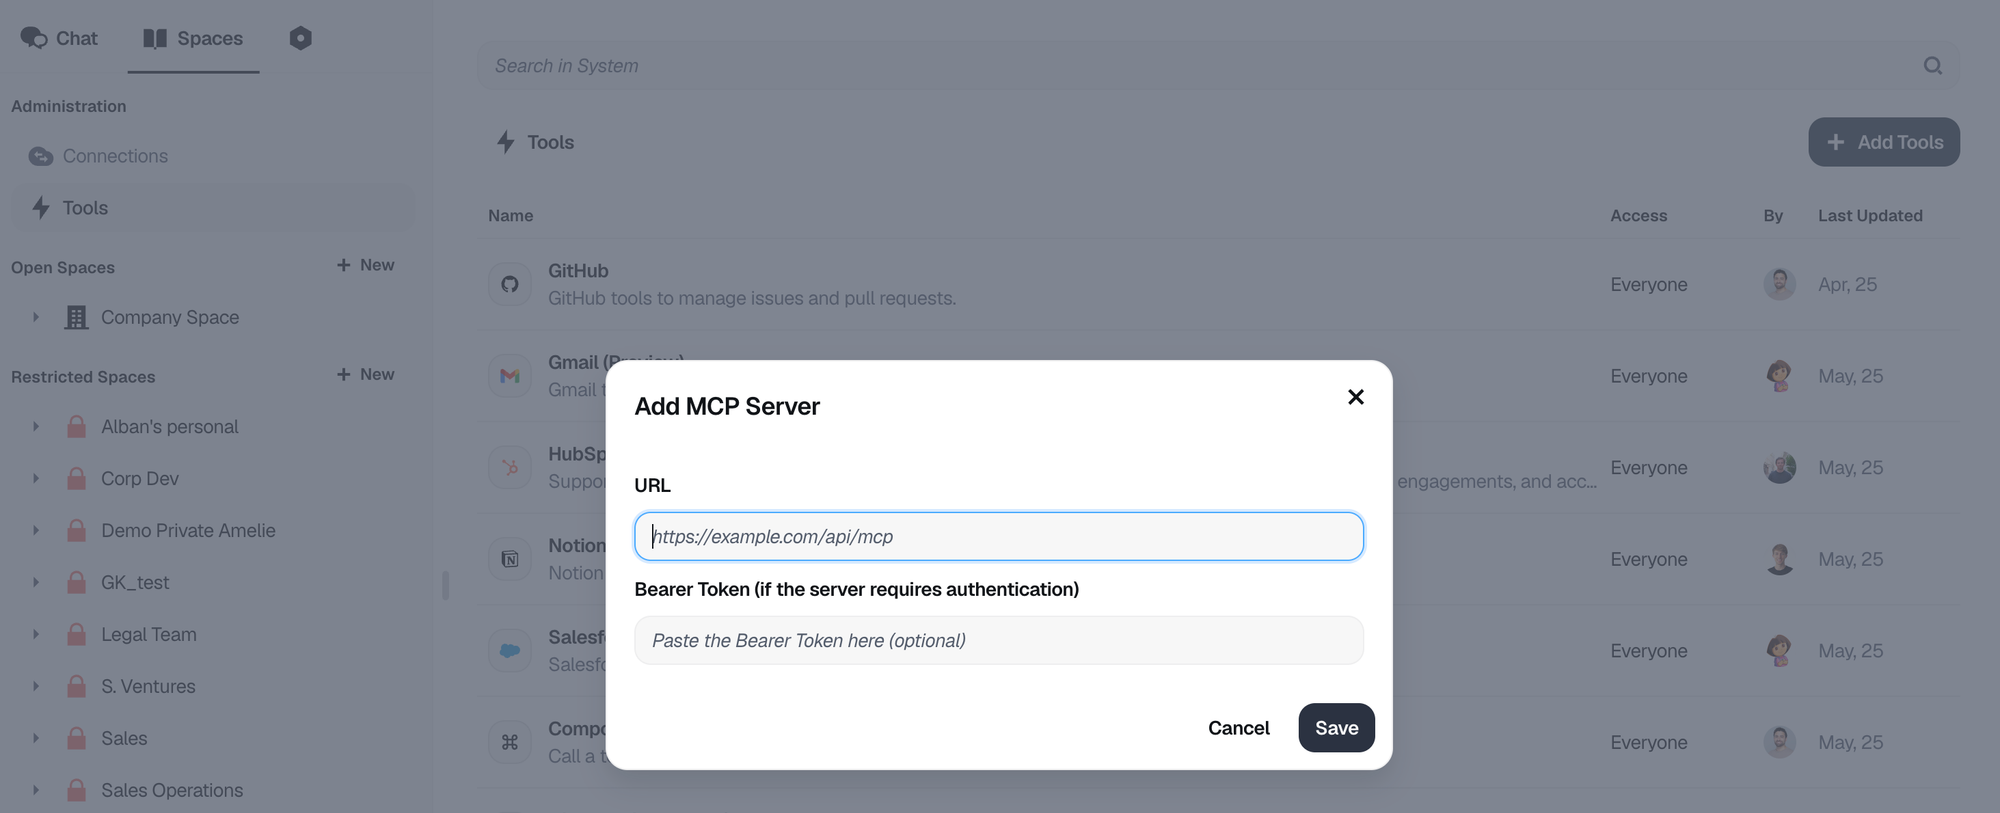
Adding an MCP server to Dust
To add a new Tool in Dust, simply go to Spaces > Tools > Add Tools. Then add the following:
- Server URL: Your deployed MCP server endpoint (the url provided by Vercel in our case was : https://mcp-demo-topaz.vercel.app/)
- Authentication: Your Bearer token if OAuth is not being used for this server.
Once you added the tool to your workspace, you can set up its behavior using tool stakes:
get_customersset to "low stake" (can run without approval)create_ticketset to "high stake" (always requires user confirmation)
Creating the agent
Building the “@GlitterySupport” agent itself was straightforward using Dust's no-code interface:
1. Instructions
We provided clear, concise instructions that defined the agent's behavior:
## Role: Support Agent

**Objective:** Efficiently assist in resolving customer issues by leveraging available tools and resources, and create comprehensive support tickets with all necessary context and information.

## Instructions

**1. Identify User Request**
- Clearly understand the user's request or the issue they are facing
- Confirm if they want a support ticket to be created

**2. Gather Information**
- Retrieve customer information from the Glittery Helmet backend
- Search through older tickets in Zendesk, the Glittery Helmet knowledge base on Notion, and Slack discussions for similar issues and resolutions

**3. Analyze Findings**
- Check if other customers have had similar issues and note how these were resolved
- Compile all relevant information in a structured and concise manner

**4. Create Support Ticket**

Divide the ticket content into two sections:

- **User Request:** Clearly state the user's specific request or issue
- **Contextual Information:** Provide detailed, structured information including past incidents, resolutions, and any additional insights to help the support team respond efficiently

**5. Finalize and Confirm**
- Review the ticket to ensure clarity and completeness
- Confirm with the user that the ticket has been created
- Provide them with any necessary follow-up details

## Example Output

**User Request:**
The customer, John Doe, is experiencing connectivity issues with the Glittery Helmet service since the last update. He has requested technical assistance and mentioned that the issue has been persistent for two days.

**Contextual Information:**

*Customer Details:*
- Name: John Doe
- Account ID: 123456
- Contact: johndoe@example.com

*Past Incidents and Resolutions:*
- Similar issue reported by another customer on May 15, 2025, resolved by updating the network settings
- Resolution involved adjusting the firewall settings as per the knowledge base article "Network Configuration Troubleshooting"

*Knowledge Base and Discussion Insights:*
- Refer to Notion article ID #789 for detailed troubleshooting steps
- Slack discussion on May 16, 2025, highlighted a temporary fix by resetting the device

By following these steps, the support agent can effectively utilize available resources to assist customers and ensure the support team has all necessary information to address the issue efficiently.
2. Add tools
Now that the agent is created, we'll give it access to the proper data sources & tools:
Data Sources
We connected the agent to existing knowledge bases:
- Confluence documentation
- Previous Zendesk tickets
- Notion knowledge base
- Google Drive resources
- Slack conversations
Tools
The magic happened when we add our custom MCP server. Just click on "Add tools", and select the tool you just created.
With everything connected, the agent immediately understand how to use the MCP tools in the right sequence, combine data from multiple sources and present information in a structured, actionable format.
The entire agent setup took less than 10 minutes, with most of that time spent writing clear instructions.
Dust built-in vs. remote MCP Servers
Let's take a closer look at when to use each.
Dust's Built-in MCP Servers
Dust provides ready-to-use MCP servers for popular platforms:
- GitHub - Repository management and issue tracking
- HubSpot & Salesforce - CRM operations and contact management
- Gmail & Google Calendar - Personal & team productivity
- More coming based on customer requests
For the rest: use remote MCP servers
You’ll want to consider using remote MCP servers when you need to:
- Connect to proprietary internal systems
- Implement custom business logic
- Integrate with specialized industry tools and there are no existing MCP servers yet
- Control exactly how data flows between systems
Best Practices for MCP Success
Here are a few tips to keep in mind to make the most out of MCP severs:
1. Start Simple: Begin with read-only tools to build confidence, then add write operations gradually.
2. Design for the AI: (i) use clear, descriptive tool names and descriptions (ii) provide comprehensive parameter schemas (iii) return structured, consistent data formats
3. Think About Workflows: Design tools that work well together. In our example, get_customers provides the customer_id needed for create_ticket.
4. Handle Errors Gracefully: Always return structured error responses that help the AI understand what went wrong and how to fix it.
5. Consider Rate Limits: Implement appropriate rate limiting and caching to protect your backend systems.
Key Takeaways
MCP represents a fundamental shift in how AI agents interact with the world around them. By standardizing these connections, we're moving from isolated AI assistants to truly integrated AI workers that can operate seamlessly across your entire business ecosystem.
The combination of Dust's no-code agent builder with MCP's universal connectivity creates unprecedented opportunities for automation and augmentation. Whether you're building simple data retrieval tools or complex multi-step workflows, MCP makes it possible to connect your AI agents to virtually any system.
The era of truly connected AI is here, and with Dust and MCP, you're equipped to build the future of work.
Getting Started Today
Ready to build your first MCP-powered agent? Here's how:
- Join our Slack community for support and examples
- Start with a simple read-only MCP server using the Vercel template
- Explore our documentation
- Watch past Dust Sessions for Builders